How to create and activate Swap
Swap is virtual memory concept used on Linux operating system. When VPS/Server is in operation, if it runs out of RAM, the system will automatically use part of the hard drive as a memory for applications to operate.
Swap-for-server
Swap is virtual memory concept used on Linux operating system. When VPS/Server is in operation, if it runs out of RAM, the system will automatically use part of the hard drive as a memory for applications to operate.
With servers without swap, when running out of RAM, the system automatically stops the MySQL service, so the error message Establishing a Database Connection often appears.
Because the use of a hard drive is slower than RAM, especially for servers that use hard drives that often don’t use SSDs, so not regularly using Swap will reduce system performance. If the situation of running out of RAM often happens, you should optimize the server, increase the cache and upgrade more RAM.
With VPS using OpenVZ virtualization technology, you may not be able to create swap because the system has automatically activated it.
Table of Contents
Instructions for creating Swap
Applicable both on CentOS and Ubuntu.
1. Check swap
Before proceeding to create a swap file, you need to check if the system has now enabled swap or not by running:
swapon -sIf there is no information or returns as shown below, the server does not have a swap and you can create.
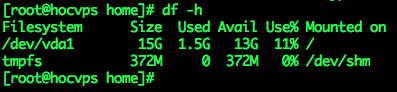
2. Check free space
Use command df -h to check free space. 13GB left, still comfortable to create swap:
3. Create swap
– Run the dd command. Here I create 1GB swap (count=1024k) for VPS 768MB RAM
sudo dd if=/dev/zero of=/swapfile bs=1024 count=1024kThe above command will create a 1Gb swap. You can replace count=1024k with count=2048k … to create a 2Gb swap. The maximum Swap capacity should only be twice the physical RAM.

– Create swap partition
mkswap /swapfile
– Enable swap
swapon /swapfileThis section may encounter a warning insecure permissions 0644 message , it’s okay, you can just ignore it. We will correct it in the next step.
– Check the swap status, you will see the following:
swapon -s
– Set automatic swap to be activated every reboot
echo /swapfile none swap defaults 0 0 >> /etc/fstab– Secure swap file by chmod
chown root:root /swapfile
chmod 0600 /swapfile
4. Configure Swappiness
Swappiness is the priority of using swap, when the amount of RAM remaining equals the value of swappiness (in percentage), the swap will be used. Swappiness has a value between 0 – 100.
- swappiness = 0: swap is only used when RAM is used up.
- swappiness = 10: swap is used when the RAM is 10%.
- swappiness = 60: swap is used when the RAM is 60%.
- swappiness = 100: swap takes precedence as RAM.
Since data processing speed on RAM is much higher than Swap, you should set this value close to 0 to get the most out of system power. It is best to set it to 10.
– Check the system’s swap file usage by running the following command line
cat /proc/sys/vm/swappiness– Adjust the swappiness parameter using the command sysctl
sysctl vm.swappiness=10– Check again you will see the result returned 10
cat /proc/sys/vm/swappinessTo ensure that this parameter remains the same every time you restart your VPS, you need to adjust the parameter vm.swappiness at the end of the file /etc/sysctl.conf(if you don’t have it, add it manually).
nano /etc/sysctl.confAdd the following line at the end if it is not there, if it is, update the value:
vm.swappiness = 10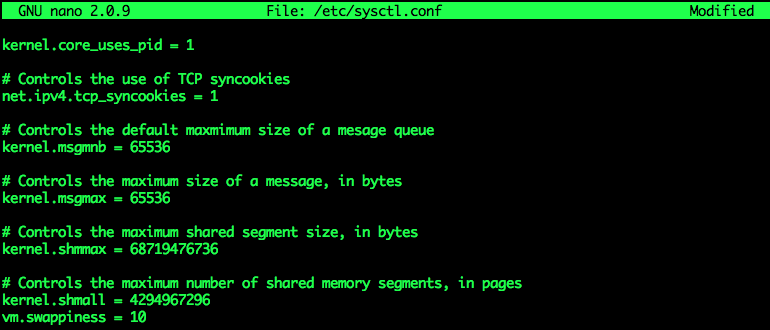
Press Ctrl + O to save, Enter and Ctrl + X to exit.
– Restart VPS and check the results again:
swapon -s
cat /proc/sys/vm/swappiness
Note
– With CentOS 7.2 can tune profile will overwrite vm.swappinessevery reboot, you need to check which profile is overwrite to reconfigure manually.
grep vm.swappiness /usr/lib/tuned/*/tuned.confOutput can be as follows:
[root@server ~]# grep vm.swappiness /usr/lib/tuned/*/tuned.conf
/usr/lib/tuned/latency-performance/tuned.conf:vm.swappiness=10
/usr/lib/tuned/throughput-performance/tuned.conf:vm.swappiness=10
/usr/lib/tuned/virtual-guest/tuned.conf:vm.swappiness = 30
At this point, open the file /usr/lib/tuned/virtual-guest/tuned.conf, find vm.swappinessand change it vm.swappiness = 30 to vm.swappiness = 10.
nano /usr/lib/tuned/virtual-guest/tuned.confPress Ctrl + O to save, Enter and Ctrl + X to exit.
Restart the VPS and check the results again.
Change swap size
If you followed the instructions above to create a swap file and want to change the swap size, reverse the process.
– Disable Swap
swapoff /swapfile– Delete file Swap
rm -f /swapfile– Create a new swap file with the desired size. For example, I created 2GB (2048k)
sudo dd if=/dev/zero of=/swapfile bs=1024 count=2048k– Create Swap partition
mkswap /swapfile– Enable Swap
swapon /swapfile– Secure swap file by chmod
chown root:root /swapfile
chmod 0600 /swapfile
– Check swap status
swapon -sWhen changing the swap size, the previous settings such as automatically activated when the server reboots, the Swappiness parameters are preserved, so you do not need to do anything else.
Now restart the server and check the results again.
Thanks to hocvps to initiate this article!