Azure Network EP7 – Create An Application Gateway With URL-Based Routing Configuration – 1

Azure-Network-EP7-Create-An-Application-Gateway-With-URL-Based-Routing-Configuration-1
Hello Everybody,
I hope, you all are doing good. Today let’s continue with Azure Application Gateway in this article. In this article, we will create and configure one Azure Application Gateway to support URL-Based Routing. In our last blog, we have discussed URL-Based Routing as a feature of AG.
If you have missed our previous articles on networking, please check them in the following links.
EP1 – Basics of Azure Networking
EP2 – Azure Virtual Network (VNet)
EP3 – Subnet in Azure Network
EP4 – Network Security Group (NSG) in Azure
EP5 – Basics of Azure Application Gateway
EP6 – Azure Application Gateway Features
Next Article: EP8 – PowerShell To Create An Application Gateway With URL-Based Routing Configuration- 2
Here I am using Azure Cloud Shell for our exercise. Azure hosts Azure Cloud Shell, an interactive shell environment that we can use through our browser. We don’t have to install anything in our local environment.
Select the Cloud Shell button on the top-right menu bar in the Azure portal as shown in the following figure.
![]()
Figure 1: Azure – Cloud shell button on the portal
Table of Contents
A. Resource Group and Virtual Network
To proceed with the application gateway, the first step is to be ready with our Resource Group and Virtual network.
We can create if we don’t have it already. In our case, We have already created them. So here we can use them.
Let’s collect all those resources, we need to create our Application Gateway. Note: In this example, I used “Devmanh” as a prefix with the name for all resources I am creating. So that I can recognize my resources.
1) Get the exiting VNet by using Get-AzVirtualNetwork by providing the name of VNet and Resource Group as shown in the following image.
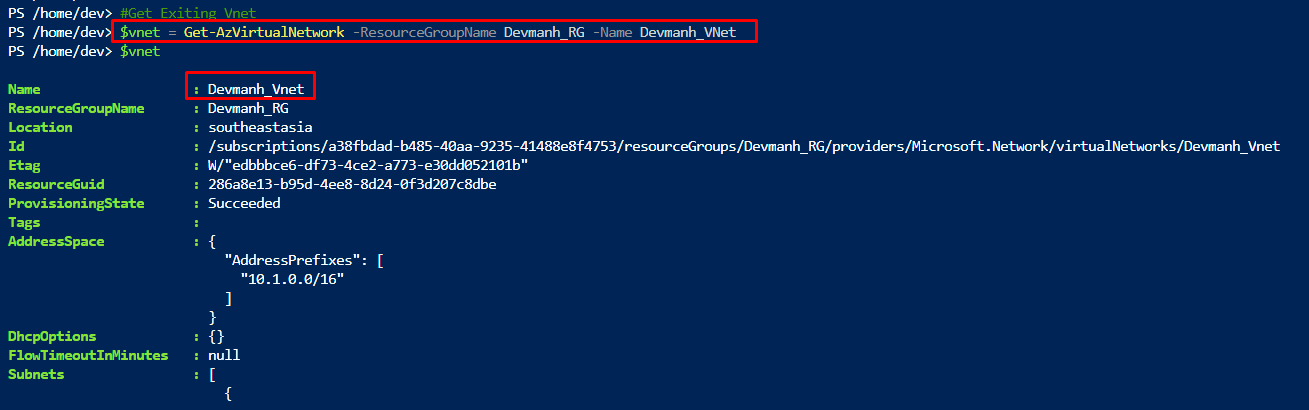
Figure 2: Azure – Getting existing V-Net for Application Gateway.
2) Get Subnet, which we created for the application gateway as shown in the following figure. In my case, the first subnet of the collection “AG_Subnet” is for the application gateway.
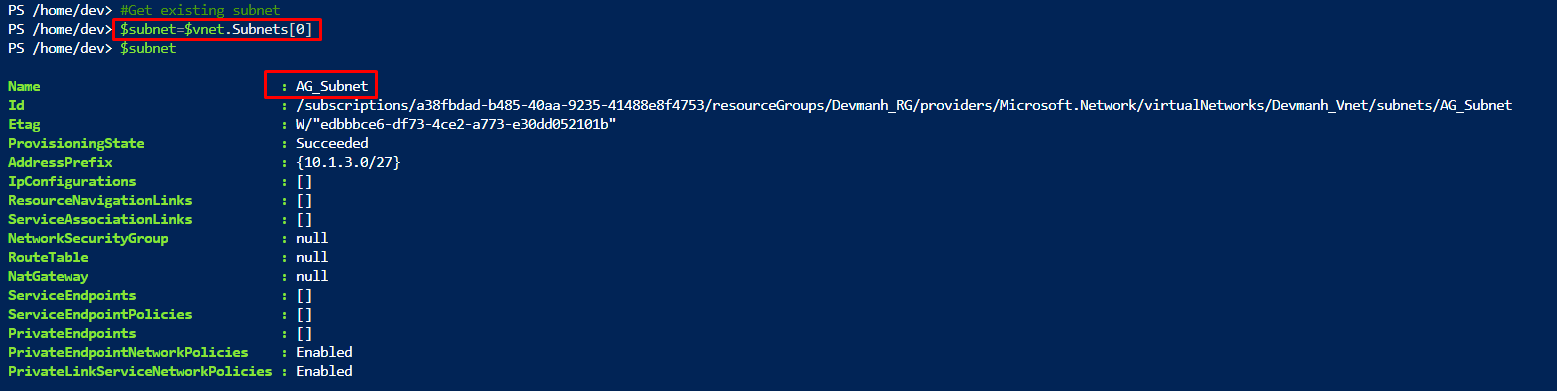
Figure 3: Azure – Getting existing Subnet
3) Let’s Create one public IP using New-AzPublicIpAddress. This Public IP will be used to provide network connectivity to the application gateway and its associated resources.
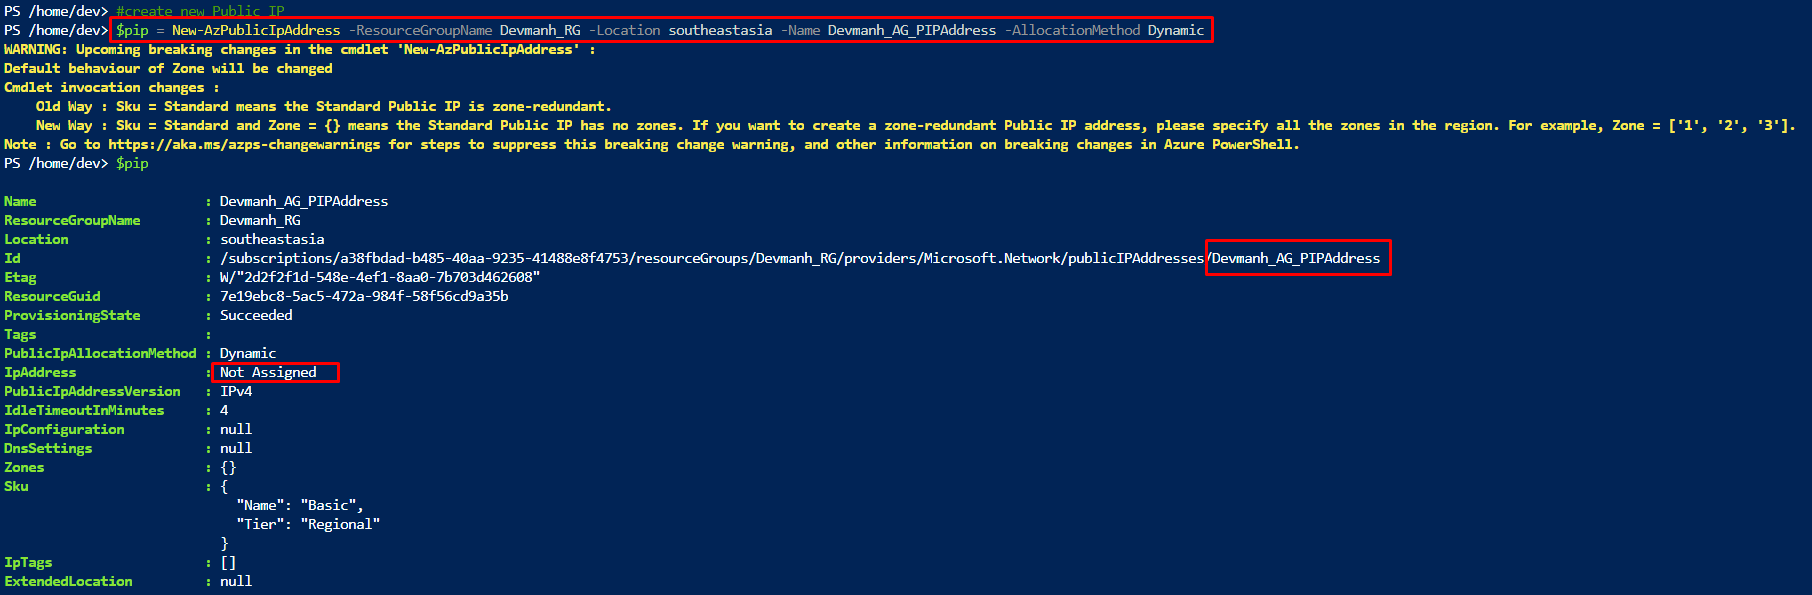
Figure 4: Azure – Create public IP
If we already have one public IP for this purpose, we can get that one using the Get-AzPublicIpAddress command as shown in the following figure.
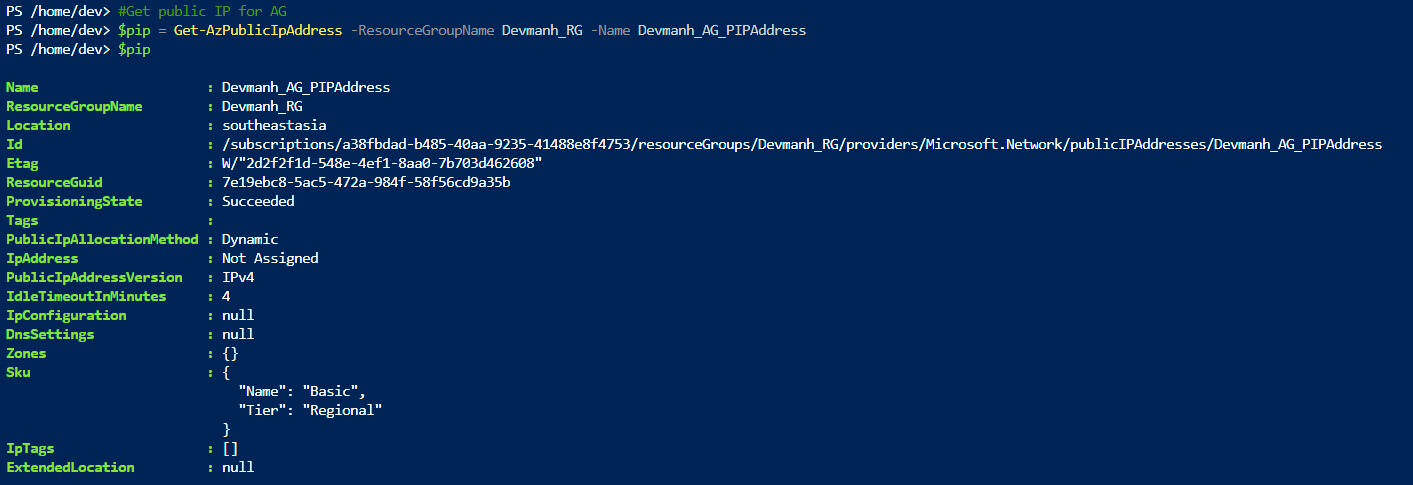
Figure 5: Azure – Create public IP
B. Create an application gateway
Before we create the Application Gateway, we need the following supporting resources in advance.
1) Application Gateway IP Configuration: It associates our subnet to the application gateway. This IP configuration contains the subnet in which the application gateway is deployed. We will use the New-AzApplicationGatewayIPConfiguration command to create an IP config.

Figure 6: Azure – Application Gateway IP Configuration
2) Application Gateway Front-end IP Configuration: It associates our public IP to the application gateway. We can create this IP config using the New-AzApplicationGatewayFrontendIPConfig command.
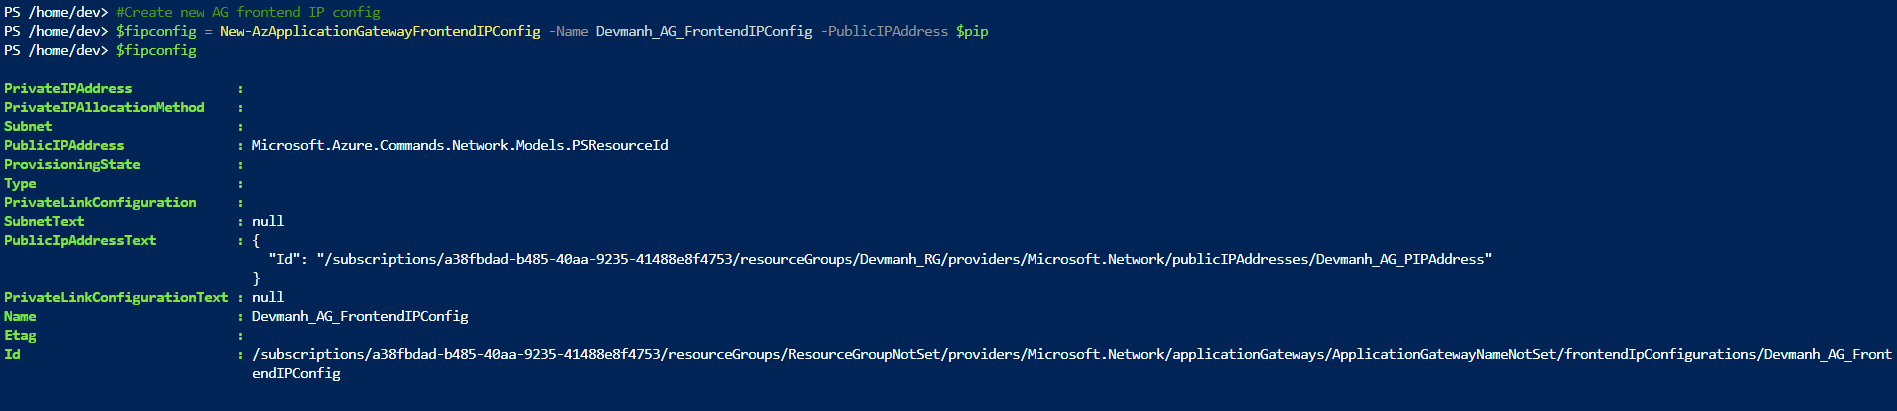
Figure 7: Azure – Application Gateway Front End IP Config
3) Front-end Port: Assigns a port to use by the default listener to access the app. Use the New-AzApplicationGatewayFrontendPort command to create this port.

Figure 8: Azure – Application Gateway Front End Port
4) Default BackEnd pool: All application gateways must have at least one backend pool of servers. We can use the New-AzApplicationGatewayBackendAddressPool command to create a new backend pool as shown in the following figure.
5) Default HttpSetting: Configure the HttpSettings for the backend pool using New-AzApplicationGatewayBackendHttpSettings.

Figure 9: Azure – Application Gateway Http Setting
6) Default Listener: The default listener listens for traffic on the port that was assigned. New-AzApplicationGatewayHttpListener command needs to use to create a new listener.
7) Default Rule: The default rule is used to send traffic to the default backend pool. We will use the New-AzApplicationGatewayRequestRoutingRule command to create a new rule.
8) Stock Keeping Unit (SKU): The New-AzApplicationGatewaySku cmdlet creates a stock-keeping unit (SKU) for an Azure application gateway.
9) Application Gateway: The cmdlet New-AzApplicationGateway is used to create and configure an Azure Application Gateway. Following figure sowing, how to use all of the above commands and passing those resources to New-AzApplicationGateway cmdlet to create application gateway.
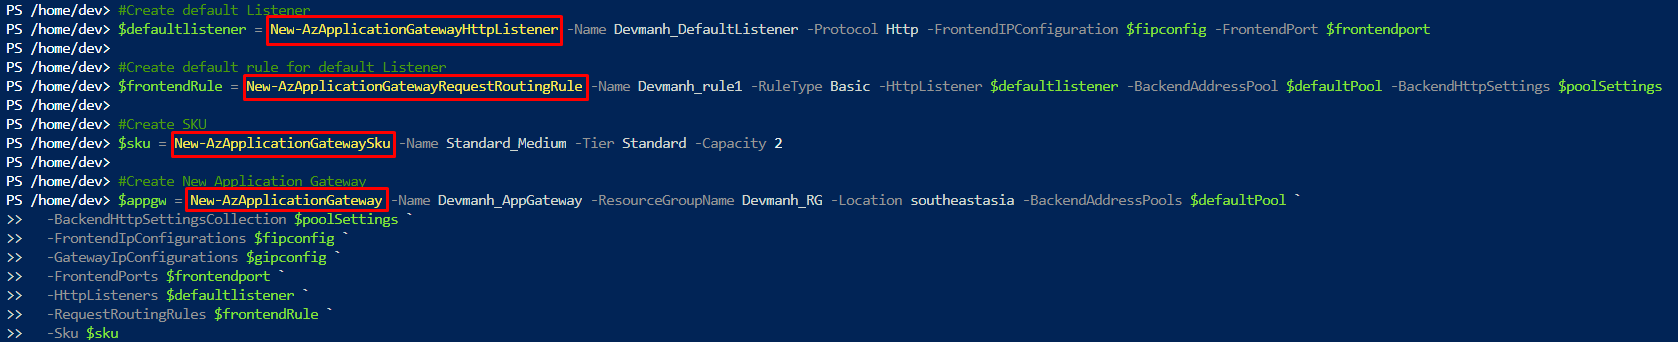
Figure 10: Azure – Create Application Gateway
Our application gateway is ready with all default configurations. Now we will configure our application gateway for our requirement, to redirect traffic to the correct backend pool based on the Url of the request. To achieve that, let’s continue with the below steps.
Note: When working with Azure Cloud Shell, if we are idle for 20 minutes then it will ask for reconnecting and it clears all local variables. In that case, we need to get all the required resources again before utilizing them.
C. Configure New Image And Video Backend Pools
1) Get Application Gateway: Get existing application gateway using Get-AzApplicationGateway command by passing resource name and application gateway name.
2) Add New Backend Pool: Add two backend pools, one is to serve Image requests and another one is for Video requests. Add-AzApplicationGatewayBackendAddressPool is used to add a new backend pool to the application gateway as shown in the following image.
Figure 11: Azure – Application Gateway Backend Pool
Now let’s add one more back-end pool for video as shown in the following figure.
Figure 12: Azure – Application Gateway Backend Pool 2
3) Add New FrontEnd Port: Add-AzApplicationGatewayFrontendPort command adds a new front-end port for the application gateway. We will use this port when adding a new HTTP Setting.
Figure 12: Azure – Application Gateway Front end Port
4) Set Application Gateway: To save all changes to the application gateway, set the application gateway frequently by using the Set-AzApplicationGateway cmdlet. This command updates the application gateway with settings in the $AppGw variable as shown in the following figure.
Figure 13: Azure – Set Application Gateway
D. Add New Listener
1) Get Application Gateway: Before adding a new listener, get the correct application gateway by providing the name as we have done in the previous section.
2) Get Front-end Port: Get existing front-end port using Get-AzApplicationGatewayFrontendPort as shown in the following figure.
Figure 14: Azure – Get Front End Port
3) Get front-end IP config: Get exiting front-end IP config of application gateway by using Get-AzApplicationGatewayFrontendIPConfig.
4) Add New Listener and Set Application Gateway: Add a new listener to listen to our Url-based traffic by using Add-AzApplicationGatewayHttpListener as shown in the following figure.
Figure 14: Azure – Add a new listener
E. Add Url Path Map Config
1) Get Application Gateway: Get existing application gateway using the Get-AzApplicationGateway command.
2) Get Httpsetting : Get existing Httpsetting by using Get-AzApplicationGatewayBackendHttpSettings cmdlet.
3) Get Backend Pools: Get all existing backend pools, created in previous steps using the Get-AzApplicationGatewayBackendAddressPool command as shown in the following figure.
Figure 15: Azure – Get Backend pull
4) Add URL Path Map Config And Set AG: Using Add-AzApplicationGatewayUrlPathMapConfig cmdlet adds an array of URL path mappings to a back-end server pool.
Figure 16: Azure – Add Url path Map Config
F. Add Routing Rule
1) Get Application Gateway: Get existing application gateway using the Get-AzApplicationGateway command.
2) Get Listener: We have created a new listener (“Devmanh_BackendListener”) for our requirement in the above steps. Let’s get the listener by using the Get-AzApplicationGatewayHttpListener cmdlet.
3) Get Url Path Mapping Config: Get the existing Url path map configuration by using the Get-AzApplicationGatewayUrlPathMapConfig cmdlet.
4) Add New Path-Based Routing Rule: The Add-AzApplicationGatewayRequestRoutingRule cmdlet adds a request routing rule to an application gateway as shown in the following figure.
Figure 17: Azure – Add New Path-Based Routing Rule
5) Set Application Gateway: To save all changes to the application gateway, set the application gateway frequently by using the Set-AzApplicationGateway cmdlet.
G. Create Virtual Machine Scale Sets ( VMSS)
Azure virtual machine scale sets let you create and manage a group of identical, load-balanced VMs. The number of VM instances can automatically increase or decrease in response to demand or a defined schedule (From MS doc).
Here we will create 3 different VMSS for our 3 different backend pools. So that when different traffic redirects to different backend pools based on its Url. There will be one VMSS to address the request. we need the following resources and information to create one VMSS.
Get Existing VNet by using Get-AzVirtualNetwork cmdlet.
Get Application Gateway using Get-AzApplicationGateway cmdlet.
Get First Backend Pool using Get-AzApplicationGatewayBackendAddressPool cmdlet by providing backend pool name.
Create New IP Config For VMSS of the current Backend Pool using New-AzVmssIpConfig cmdlet.
The New-AzVmssConfig cmdlet creates a configurable local Virtual Manager Scale Set (VMSS) object.
Set Storage Profile properties For VM Scale Set using Set-AzVmssStorageProfile cmdlet.
Sets the VMSS operating system profile properties using Set-AzVmssOsProfile cmdlet.
Adds a network interface configuration to the VMSS using Add-AzVmssNetworkInterfaceConfiguration cmdlet.
Create a new VMSS for the current backend pool using the New-AzVmss cmdlet.
Do the steps from 3 to 9 for the rest of the two backend pools.
Figure 18: Azure – Create New VMSS
H) Install IIS To All VMSS
Once we have created VMSS for all backend pools, let’s install IIS to all VMSS using a script provided by Microsoft in the following link.
“https://raw.githubusercontent.com/Azure/azure-docs-powershell-samples/master/application-gateway/iis/appgatewayurl.ps1”.
Create a publicSetting for the above link.
Get one VMSS object using Get-AzVmss cmdlet by providing the name of the VMSS.
Adds an extension to the VMSS using Add-AzVmssExtension cmdlet by providing publishSetting we created earlier.
Update the VMSS using the Update-AzVmss cmdlet.
Do all steps from 2 to 4 for the rest of the VMSS.
Figure 19: Azure – Add Extension
Figure 20: Azure – Deployed Extension
I) Test The Application Gateway
Now we are all set to test our AG. For that let’s get the public Ip of the application gateway using the following cmdlet.
Get-AzPublicIPAddress -ResourceGroupName *_RG -Name ourPublicIPName
Once we got our IP then test the following links by replacing ***.**.*.* with our public IP.
http:// ***.**.*.*
http:// ***.**.*.* :8080/video/test.htm
http:// ***.**.*.* :8080/images/test.htm
Figure 21 – Azure – Testing Result Application Gateway
I hope this article gives an idea to configure Application Gateway. In my next post, we can download the complete script to configure the Application Gateway. My next article of this series is EP8 – PowerShell To Create An Application Gateway With URL-Based Routing Configuration- 2.
Thanks for reading 🙂
Keep reading, share your thoughts, experiences. Feel free to contact us to discuss more. If you have any suggestions/feedback/doubts, you are most welcome.
Stay tuned on the blog, will come up with more such articles.
Manas KJ